

Last updated March 2018
Taking high quality photos of Nishigoi
Common mistakes
Obtaining a pin-sharp image and using pre-focus for photographing Koi carp
Getting the right exposure when photographing Koi and other fish
What you need to photograph Koi and other pond fish
The do’s and don’ts of Koi photography
Taking high quality photos of Nishigoi
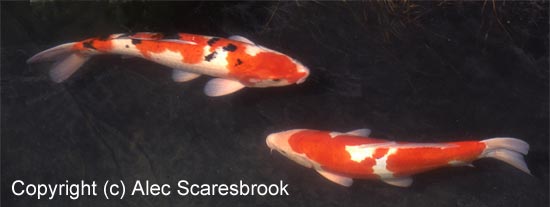
Two stunning male Nishigoi: a Kohaku (white and red) and a Sanke (white, red, orange, black).
Good Koi carp photography doesn’t happen overnight. The saying ‘never work with animals or children’ is as true for photographers as actors; both needing predictability for success. Having photographed ponds, plants and gardens for the past 25 years or so, I’ve learnt how to take the best shots possible. When I began photographing Nishigoi a few years ago for water gardening magazines such as Koi, Ponds & Gardens, I applied the same principles, and in the days of film, I always shot plenty of photos as insurance.
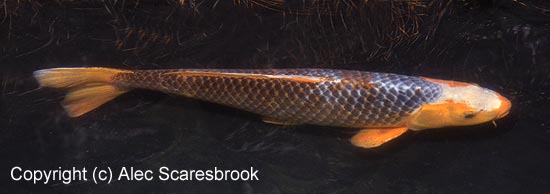
Another male Koi carp – this is an Asagi.
Koi keepers have the advantage over professional photographers of being on the spot, so they can study their pond from all angles at different times of day and wait for the best conditions. Ideally (although not always possible), wait for a bright day when a thin veil of cloud covers the sun to produce a diffused and shadowless light. Bright sunshine casts dark shadows, and this type of light is a problem because the film can’t record details from the darkest and lightest areas of a scene.
On a sunny day you will also find shadows of nearby objects across the pond, spoiling the photo completely. Sometimes you can move the items casting the shadow, but can’t do much about a pergola, tree or telegraph pole. It’s better to wait for a cloudy sky, or for a large section of the pond to be thrown into shadow and then photograph in this area.
I’ve always photographed fish in their ponds rather than bowled up. This has been either because of time considerations or the owners’ reluctance to net their precious pets any more than strictly necessary. Some fish have rarely been bowled up, so to avoid stressing them and the owners, I keep to pond photography.
Common mistakes
Having looked at the photos of Koi taken by proud owners, I’ve noticed some common mistakes:
- fish that are too small in the picture
- blurred images
- muddled scenes
- distorted images (due to fish being too deep in the water)
- fish blending in with the background
- distracting reflections and dark shadows
- inaccurate colours.
These mistakes can all be easily avoided with a little thought and attention to detail.
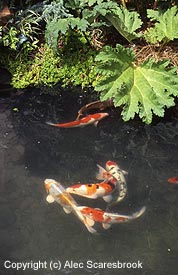
This photo of Koi (Sanke, Tancho Sanke, Doitsu Kujaku, Kujaku and Kohaku) is muddled, over exposed and the leaf reflections and shadows are distracting.
Some problems relate to composition, others to camera settings. Some are difficult to resolve, such as photographing dark fish against a dark liner. The only answer here is to bowl up the fish.
If you’re at the planning stage of your pond, you could keep photography in mind and consider using a blue or pale liner instead of black. However, you’ll probably still have to scrub the surface before a photo session to make sure that your Koi show up well.
Apart from the problem of isolating a particular Koi in the scene, which only plenty of time can achieve, the main technical aspects are achieving the correct exposure and removing reflections on the water’s surface to obtain a good image with the correct colours.

Dark coloured Koi are very difficult to photograph against a dark liner. In this photograph the fish is too deep in the water and too small in the picture. At least this Shiro Utsuri has plenty of white to show it up, but this photo doesn’t do justice to this prize-winning female.
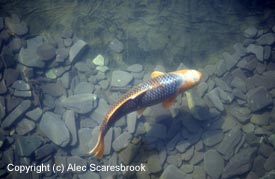
The dark slate background has fooled the automatic exposure meter. The overexposed result is that the orange of this male Asagi is bleached out, and the background is smoky. Whether with digital, or with transparency film, this is the photographer’s fault. Also part of the Koi’s body is in shadow.
Obtaining a pin-sharp image and using pre-focus for photographing Koi carp
Pin-sharp images
A tripod prevents camera shake but is not suited to photographing fish, which are rarely in one place for long. You need to develop sports’ photography techniques to avoid blurred images. Use fast shutter speeds, hold the camera steady, view your target through the viewfinder and pan the camera.
Avoid camera shake by standing squarely with feet apart, supporting the camera base in the palm of one hand with your fingers gripping the lens. With your other hand, grip the side of the camera and place your forefinger on the shutter button.
Pre-focusing
Pre-focus the lens and also adjust the polarising filter (from Kelkoo) to eliminate any reflections in the water where you intend to photograph your fish. Wait for your chosen fish to swim towards the photographic area. Look through the viewfinder and smoothly follow the fish to your photographic zone. When the Koi looks just right, press the shutter button.
Why pre-focus with a camera that already has auto-focus? Because I’ve discovered that I miss shots when the camera is busy trying to focus and won’t let me release the shutter.
Take several shots if your camera has a motor drive or sports mode, but keep panning as you do so. If your camera has a continuous focusing system, use that. With practice, you should soon be producing good quality shots for yourself, for entering competitions, and for sending to magazines.
Getting the right exposure when photographing Koi and other fish
Unfortunately, a camera’s exposure meter doesn’t always calculate exposure correctly, so a dark area behind a fish means that the camera will automatically overexpose the image, creating a photo that looks smoky or washed out.
Fortunately you can use a special grey calibration card (from Kelkoo) to set up the exposure correctly beforehand. But remember, if you use an 18% gray (mid gray) card to calibrate the camera exposure, check that the light falling on the card is the same quality as the light falling on the area of the pond you’re going to photograph.
If the colours are still smoky, and you’re using print film, it’s likely that the automatic settings at the print processing lab are causing the problem. So go back with the negatives and prints, explain what’s wrong with the colours, and ask for reprints.
If you haven’t got a grey card, you could bracket the exposures (i.e. repeat the shot with adjacent exposure settings), but duplicating the image is often impossible because Koi move quite quickly. Also, you can guarantee that the best composition of the set of bracketed shots will be the one that is incorrectly exposed. This is the same law that ensures buttered toast always falls face down on the floor. Instead of bracketing, you could use the exposure guide supplied with the film (really!) to decide how much the camera’s light meter is being fooled.
An additional problem is the polarising filter. I’ve always had to fit this to remove surface reflections when photographing Koi. The filter darkens the image seen through the viewfinder, and recorded by the film, so I have had to increase exposure by as much as two and a half stops. This means either setting the camera to a slower shutter speed (increasing the possibility of camera shake, although image stabilisation features make this less of a problem now), or increasing the lens aperture (which narrows the depth of field, so reducing what is in focus) or adjusting both of these settings.
In practice
I use 100 ISO for digital or transparency film for fine grain high quality colour photos for publishing. A day with bright but hazy sunlight is ideal for photographing Koi. Before I put a polarising filter on the lens, one exposure option is f8 at 1/125sec. With care these settings produce good sharp photos without using a tripod. After I put the polarising filter on the lens, the exposure options can be between f4 and f2.8 at 1/125sec, f5.6 and f4 at 1/60sec, or f8 and f5.6 at 1/30sec. I instantly reach for the 50mm (standard lens) because this lens has a wide range of apertures to choose from. I set the lens aperture between f4 and f2.8 to give me the fast 1/125 sec shutter speed. None of my other lenses have apertures that open wide enough, so only the 50mm will do the job.
If you haven’t got a 50mm lens and the photo is not for publication then you could use high speed film to boost the shutter speed, but expect grainy images and less colour saturation. You could try photographing on a sunny day, but watch out for contrast problems. I’ve had to photograph Koi on sunny days and been successful – it’s just a matter of making the best of it and taking lots of shots in order to get one or two good ones.
What you need to photograph Koi and other pond fish
You need an SLR (single lens reflex) camera (eg from Kelkoo), maybe a 50mm lens and a suitable polarising filter for this photography. I say ‘maybe a 50mm lens’ because the lens you choose depends on how good a photographer you are.
The latest digital SLRs and camcorders have added a new dimension to Koi photography. My camera has a continuous focusing system and the lens has an image stabiliser (vibration resistance) with a switch for panning shots.
This technology has made Koi photography much easier and given me more successful images, but there’s a downside – the delay between pressing the shutter release and the photo being taken. Now I have to pre-empt the shots to take into account the delay, which although slight, can still mean missing the perfect shot. But the great advantage of digital is being able to check the images straight away, so I know if and when I’ve got the shot I want.
The do’s and don’ts of Koi photography
Do…
- Photograph Koi where there are no reflections on the water. Spend time walking around the pond to find the best place, which will depend on the time of day.
- Use a high vantage point. Stand on the pond’s edge, a bridge or steps for overhead shots of Koi.
- Use a polarising filter to remove reflections, but be prepared for a much darker image in the viewfinder. A polarising filter cuts down the light reaching the film or sensor so you’ll need a slower shutter speed or wider aperture to compensate. Slower shutter speeds increase the risk of unsharp photos. Wider apertures reduce the in-focus area to the front and rear of the object focused on, so you may not obtain a sharp image of the whole Koi.
- Point the camera at a grey card to set the correct exposure.
- If possible, use a shutter speed of 1/125 second or faster for hand-held shots, which should prevent blurring from camera shake.
Don’t…
- Risk a splashing or a ducking for you or your camera. Use the camera neck strap at all times. Always store camera accessories away from the pond, and move away from the pond’s edge to change filters, films or lenses.
- Photograph in bright sunshine unless you have to. Wait for shadowless light.
- Rely on the camera’s exposure meter to calculate the right settings.
- Use very high ISO speed otherwise the photos will be very grainy.
- Be mean with film (assuming you are still using a film camera). The only way to get good shots is to take plenty of pictures.