

Last updated 2nd June 2014
Puddled clay – a traditional pool lining
Pros and cons of puddled clay ponds
Is your site suitable for a clay pond?
Can you use your soil to make a puddled clay pond?
How much clay is in your soil?
Buying clay
Planning for a clay-lined pond
How to create a puddled clay pond
Choosing plants for a puddled clay pond
Maintaining a puddled clay pond
Puddled clay – a traditional pool lining
Using puddling clay to make a waterproof lining for a pond is rarely mentioned these days – it’s all butyl, fibreglass and concrete. But before these modern developments, clay was the only suitable material available, and if you’re doubtful of it’s success, you’ve only to look around at our canal system – originally lined with puddled clay.
What exactly is puddled clay? It’s clay that has had all the air pockets squeezed out of it to make a solid, immovable, watertight layer. You have to do the puddling so it is a labour intensive method, but clay is cheap and provided you are careful, you should have a trouble-free pond for years. So a small pond in the back garden shouldn’t be a problem, should it? Read on to find out, and once you realise the problems, you’ll probably want to install a a pre-formed pond liner or a sheet liner instead!
Pros and cons of puddled clay ponds
Like all construction methods, there are advantages and disadvantages to weigh up carefully. Local advice is useful because it’s specific to your area – contact your county agricultural and horticultural college (online yellow pages) for information on soils in your area and advice on clay-lined ponds.
Contact your local wildlife trust/countryside ranger service (again, use online yellow pages or your local council’s website or library) for information. They are quite likely to have created wildlife ponds from puddled clay and will be able to show you them and give tips. You may be able to join volunteers in creating a pond too, gaining valuable experience.
Advantages
- Low cost of materials – either your own clayey garden soil (free), or special puddling clay (cheap).
- Natural looking pond.
- An excuse for a party – invite your friends to bring their wellies to a puddling party.
Disadvantages
- High cost of transport of puddling clay – especially over long distances.
- Your site may not be suitable – see next section.
- Essential to keep the pond full to the brim so that the clay never dries out and cracks around the edge.
- A clay lining is thicker than a sheet liner, so you need a bigger hole, which takes longer and creates more spoil.
- Time consuming to puddle the clay by foot or machine.
For large-scale works you need tracked machinery to run back and forth to squash out the air – potentially expensive. Puddle clay suppliers can advise on machinery required.
Is your site suitable for a clay pond?
Puddled clay needs a firm base, so you cannot use this method on recently disturbed land, or too near the edge of a slope where soil may creep downwards or subside.
Some soils are unsuitable too. Gravelly, silty and peaty soils are affected by ground water and move. The puddle clay will also move, resulting in cracks and leaks.
Can you use your soil to make a puddled clay pond?
Take a handful of moist soil, rub it between your finger and thumb and mould it in the palm of your hand. If the soil is sticky, workable like Plasticine, stains your skin, can be smoothed and made shiny, and doesn’t crumble when released, it’s clay. This is quite likely to be found at a depth, but soil from nearer the surface may crumble when released. This is a clay loam. Dark soils are due to decomposing plant material; a gritty feel means there’s sand or gravel. Silty soils feel silky but you can’t smooth and polish them. Good garden loam feels neither sticky nor silky.
If you have really clayey soil in the garden, the action of digging may smear the sides of the hole sufficiently to keep water in. It’s worth digging a trial hole and filling it with water to see how long it remains full. The depth of topsoil will determine the final water level. Water may leak away through the topsoil, but should be retained by the subsoil.
If the soil isn’t clayey enough to hold water without help, then try smearing the sides of the hole with a thick layer of wetted soil from the spoil heap and puddling it to create a watertight liner. However, any stones or organic material present will prevent you from being able to squeeze out every last gasp of air from the clay lining.
How much clay is in your soil?
The ideal minimum clay content of a soil for a leakproof pond is 60%.
To test your soil, take a sample, let it dry out, then break it up as well as you can before adding it to a container of water. A tall straight-side container (e.g. a spaghetti jar), is best because it’s easy to see the relative amounts of each consituent. Half-fill the container with water, add the soil, then top up with water. Turn it upside down as many times as necessary to get the soil in suspension and then watch the soil settle out.
Most of the larger particles of sand will settle in about 20 minutes, with the fine clay staying in suspension for a long while and any organic matter floating to the surface. Once all the soil has settled, measure the total depth of the soil in the container, plus the amount of organic matter. Then measure the depth of clay particles (ie those that are obviously not sand).
To calculate the amount of clay:
1. Divide the depth of clay by the total depth of all the soil and the organic matter.
2. Multiply the answer by 100 to obtain the percentage of clay.
eg. if there’s a total of 10cm of soil and organic matter, of which 2cm is clay, divide 2 by 10 (=0.2), then multiply by 100 (=20) to obtain the percentage (20%).
Buying clay
If your soil isn’t usable, look in the Yellow Pages or the online yellow pages, and other directories for clay suppliers. If they don’t supply puddle clay they’ll probably know who does.
Clay doesn’t cost much, but moving it around does. If you live in the right area, then the price of the clay plus transport could well be less than a butyl liner.
How much clay will you need?
The clay lining should be at least 15cm thick, preferably 25cm thick to reduce the risk of damage by accidental prodding, vandalism, plant roots and worms. An even thicker layer is necessary for large ponds and lakes – ask the clay supplier for advice.
Estimate the area to be lined in the same way that you would for a sheet liner. There are two ways of calculating this:
- If you have already dug the hole, drape a tape measure inside from edge to edge. Measure the length and width. Multiply together to obtain the area.
- If you haven’t dug the hole, mark the outline and measure the length and width on the ground’s surface. Add on twice the planned depth to each measurement. Multiply the result to obtain the area.
Ask the clay supplier for a quote for sufficient clay to cover this area to the required thickness.
Planning for a clay-lined pond
For any pond, the longer spent on planning, the better the result. The shape, siting and finishing of any pond are important, no less for clay.
Existing vegetation
Don’t site your clay pond near trees because the roots will make digging difficult, and future growth will probably break through the clay. As a rough guide, tree roots extend as far outwards as the branches, with poplar and willow twice as far.
Also beware of other nearby vegetation that could cause problems later. A lawn leading up to the pond looks lovely, but if your lawn contains couch crass then you’ll be in trouble. Couch grass has very invasive roots (rhizomes) – you’ll spot them once you begin digging. If you have this plant, the best solution is to spray off the future pond’s surroundings with a translocated weedkiller such as Roundup, which is taken up by the leaves and transported to the roots, so will kill all the greenery that it touches.
Fish and pond plants
Plan the pond depth to ensure any fish will survive winters in your area.
Also plan for plants. You can’t plant into the clay, so plan shelves at the correct depth for baskets of marginal plants. Also check on the depths that deeper water plants (such as water lilies) need to thrive.
Finishing off the pond edge
The top edge of the clay lining needs protection from drying out, and from feet or rain eroding it away. So you need the edging materials to hand on the day you puddle your pond so you can protect the edge immediately.
You could use slabs, pebbles, a layer of topsoil or turves (of seed-grown grass, not meadow grass which could contain couch), or even strips of stone-faced edging liner. With these strips, you’d have to anchor the land-side of the strip and if you do this with turves or low-growing plants, ensure some of their roots can tap into soil, otherwise they will die off and the liner edge will be exposed.
Ease of topping up
Hot and/or windy weather both cause evaporation, so be sure that you can easily top up the pond from a nearby water source (for example by hosepipe from a tap or rainwater butt).
How to create a puddled clay pond
Once you’ve marked out an outline, it’s time to start digging, taking care not to loosen more soil than necessary. Dig out any shelves from compacted soil – don’t attempt to build them up later from loosened soil because it won’t work.
Having double-checked that the excavation is large enough to accommodate the thickness of clay, begin lining the base with clay. Keep it wet and workable, treading the air out of it as you go. Some people make wooden implements or use the edges of planks to knead the clay with.
Once you’re satisfied that you have a sealed base, move up to the sides, never letting the material dry out. This means you’ll be sloshing around in a footbath, bucketing the water from around your feet to keep the sides wet. Keep going until you reach the lip of the pond, which must be attended to just as diligently. Have your edging material (turves, topsoil, slabs or edging liner) to hand to put in place immediately, and then fill the pond to the top.
You’ll now have an extremely murky pond containing suspended particles of clay. This will take many weeks to settle, and won’t ever settle if the clay sides become exposed, because rain will wash more particles into the water.
Choosing plants for a puddled clay pond
A mixture of floating oxygenators and plants on the shelves and edge of the pond should help the water in the new pond to become balanced.
You’re bound to get the usual pea-soup algal bloom at first, which will go once the excess nutrients are exhausted, but the murk due to suspended clay particles may remain a problem for some while. Be patient, and if the problem doesn’t resolve itself, choose one of the products sold for clearing turbid water.
At the edge of the pond, choose plants that grow in neat clumps (e.g. such as marsh marigolds, Mimulus, water avens, Primula), or spread with a shallow rooting system (e.g. creeping Jenny). Avoid reeds, sedges, watermint, yellow flag, cotton grass, bog bean and other plants that we associate with natural pools and lakes because the roots are invasive and can easily damage the clay lining.
Maintaining a puddled clay pond
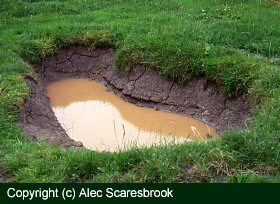
Copyright (c) Alec Scaresbrook. Cracked clay means a leaking pond
We can’t emphasise enough how important it is to keep the water levels topped up – the photo shows the problems caused by evaporation. As the water level drops, the clay dries out and cracks, so when you do top up the levels, the water just leaks away.
Investigate any sudden water drop and puddle more clay into the leaking area as soon as you can. Otherwise the problem will just get worse, making it more difficult and time-consuming to repair.
One thought on “Puddled clay ponds”
Comments are closed.