
Project description:
Installing a sheet pond liner – materials and equipment
Ground preparation
Preparing the pond edging strip
Curving the pond edging strip
Levelling the pond edging strip
Making a retainer for a beach
Completed pond edging framework
Installing the pond underlay
Finished pond
Disguising the liner edge
get_piclinks ();
?>
Project description:
The following notes and photos show how we installed a small circular sunken pond for wildlife in our garden a few years ago. The biggest problem with any pond is ensuring that the pond edge is level. As water always finds the horizontal, the filled pond will reveal any lop-sided digging, by which time it’s too late. Unless you have lots of time and energy to repeat the exercise, you are left with a permanent reminder of the problem and a new project – a cover-up job.
We have used a method that allows for accurate positioning and levelling of the pond edging, by using an edging framework to fix in place and drape the liner over.
When we had to re-line the pond some years later after a puncture, we were pleased to find the framework as good as new.
See this short step-by-step video. The details of installation are covered on the other pages of this site.
Also see part 2 of this video – Disguising the liner edge using pond-in-a-basket effect, using woven hurdles.
Installing a sheet pond liner – materials and equipment
Materials:
- Flexible pond liner and underlay. Pond liners are supplied with different guaranteed lifetimes – you get what you pay for. Don’t skimp on underlay either.
- Strips of exterior plywood (2 or 3 ply), 4-5in deep. Buy the plywood from a timber supplier and order it ready cut to size – it saves a lot of work.
- Wooden stakes for attaching the strips of plywood. Use roofing lath because it is treated against rot and can be bought off the shelf from a timber yard.
- Plated roofing nuts and bolts for fixing plywood strips together. These are inexpensive and can be obtained from a fastenings supplier – find one in your Yellow Pages or online yellow pages.
- Plated counter-sunk pozzi-drive screws for fixing the edging strip of plywood to the stakes. Buy these from the fastenings supplier. Buy good quality screws to match the longevity of the exterior ply.
Equipment:
- Spirit level.
- A length of wood as a straight edge for use with the spirit level. Order a length of wood from a timber supplier.
- G-clamp.
- Drill (hand or electric).
- Drill bit for making the bolt holes to fix the plywood strips together. Buy the drill bits at the same time as buying the bolts.
- Drill bit for the pilot holes for screwing the plywood strips to the stakes.
- Counter-sunk drill bit.
- Saw for cutting the lath. A tenon saw will do the job.
- Hammer. For driving in the stakes.
- Screwdriver.
- Scissors.
- Tape measure.
- Digging tools.
- Wheelbarrow for carting away waste soil.
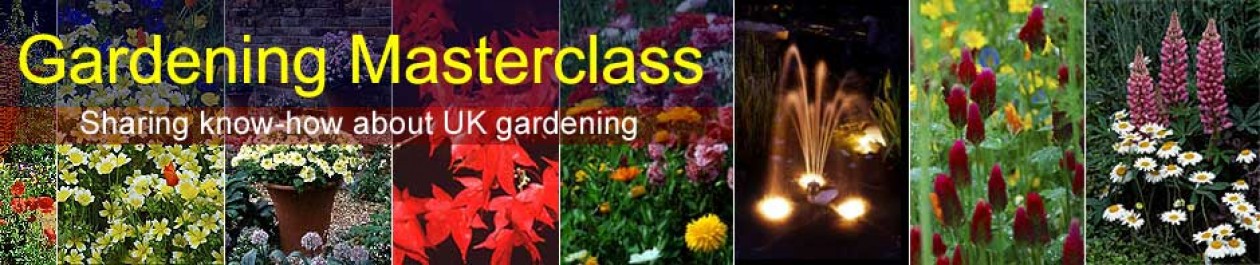
Ground preparation
The liner at the back of the hole is part of an exisiting bog garden.
Obviously, digging the hole is the hardest bit of making a sunken pond.
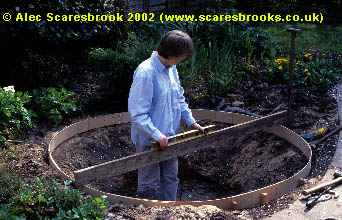
The soil that you dig into will probably be compacted, but any soil put back in the hole to correct over-enthusiastic digging will be loose and will settle under the weight of water. So be careful not to dig out too wide a hole, so you can maintain compacted and firm support for the finished pond edge. Scrape out a shallow ledge around the hole’s edge to accommodate the depth of plywood strip. The aim is for the top edge of the pond liner to be slightly proud of the surrounding ground (see the picture of the finished pond). Establish the top height using a length of wood and a spirit level (see picture – right) as you dig.
The pond should have a deep section, at least 45cm (18in) deep (preferably 60cms (2ft) deep in colder areas), so that even if the water freezes over on top, it should remain liquid in the depths, which will help amphibians survive a bad winter.
The pond’s sides should be carefully shaped to avoid a saucer-like cross-section. The problem with a saucer shape is that much of the water is very shallow. Steeper sides result in a greater volume of water in relation to the pond’s surface area, which reduces the likelihood of temperature fluctuations. Pond life thrives in a stable environment.
However, vertical sides to a pond are difficult to create because the soil tends to collapse as you dig, so aim for as steep a sloping side as possible in this case, incorporating a planting shelf part-way down for marginal plants.
Make one portion of the edge more gently sloping than the rest so that creatures can enter and leave the pond easily. After all, it’s quite common for hedgehogs to fall into ponds and drown because they can’t scramble back out; frogs and toads find steep sides a struggle too.
When you’ve dug your hole, remove any tree roots and stones from the surface of the hole.
What could go wrong:
- You could hurt yourself with enthusiastic digging. Really! Pace yourself.
- Loading too much soil onto the spade. The resulting backache isn’t worth the perceived time saved. Use a border spade which has a smaller, thinner and sharper blade and is lighter and easier to use.
You could reach the water table so the hole fills with water, which is annoying and messy. Bail out the water with a bucket, or wait for a dry period to dig the hole.
Preparing the pond edging strip
Partly completed edging strip
Join the first two strips of exterior ply together, using four nuts and bolts for the join.
Cut the roof lath and make pointed stakes, around 12-18in long, or more. Drive in the stakes, spaced as necessary to support the edging lengths. Curve the edging strip of exterior ply and fix it to the inside of the stakes by drilling pilot holes though the strip into the stake. Use a counter-sink drill bit to finish, and then screw the strip to the stakes.
Curving the pond edging strip
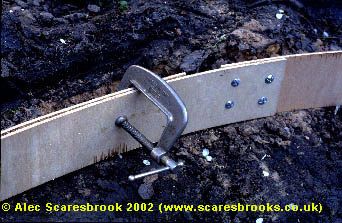
Clamped strip prior to joining
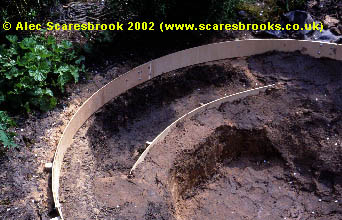
Build up the pond edging to make a circle.
Use a G-clamp to hold the plywood strips together for drilling the holes for the bolts.
Make sure you leave a gap between the outer edge of the plywood strip and the surrounding soil. This is where you will tuck the underlay and liner when finishing the pond.
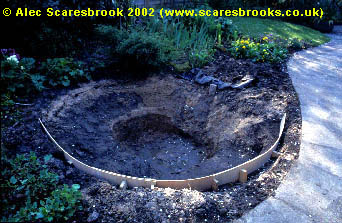
Levelling the pond edging strip
Checking
Make sure that your edge is both circular and level.
Check that the edging strip is level by using a spirit level along a straight edge, tapping down the edge where necessary. For a perfect circle, check the diameter measurements and reposition the edge as necessary.
Drive in more stakes around the edge and fix more strips of plywood to the stakes. You will probably need shorter stakes than the earlier stage, as you will now have less room to manouvre, and the stakes have to go in the right place first time. So you don’t want the risk of not being able to drive them fully home in the place you want them. Getting the your edging strip absolutely spot-on is well worth the time and trouble so don’t rush this stage.
Making a retainer for a beach
Beach retaining lip
We included a shelf as a beach area of large pebbles and stones to give an escape route for creatures that might fall in the pond, plus access for frogs etc, and a place for birds to drink and bathe.
To ensure the beach couldn’t slide into the pond, we made a retaining lip from a plywood strip, using the same method as for the pond edge.
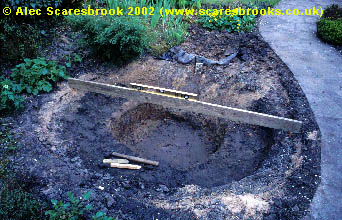
Completed pond edging framework
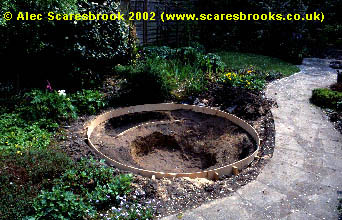
Ready for the underlay
At last, the finished pond framework of exterior plywood strip with a retaining strip for an area of pebble beach, ready for the underlay and liner.
Installing the pond underlay
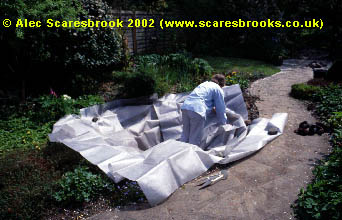
Wrestling with the underlay
Use underlay designed for ponds, because it doesn’t rot and its close weave resists root damage, unlike turves newspaper or old carpet. If you have to replace the liner later for some reason, the underlay will still be serviceable.
If the hole has water in it then it’s no problem, just push the underlay down into it. Cut off some of the excess at the edges, but leave the final trimming for much later, once the liner is on top and the pond filled with water.
Finished pond
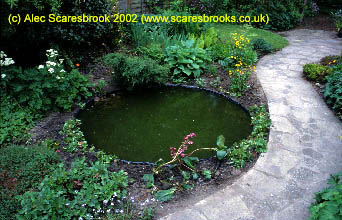
Newly finished wildlife pond with edges planted
Bring garden soil up to the edge, levelling it with the adjoining ground. Tamp down the soil with the back of a rake head so it is just below the edging strip, otherwise when it rains, soil will wash into the pond.
One way of disguising the edge (as seen here) is with mosses and plants that will eventually trail over the edge, or hide the edge with their large leaves.
Expect the pondwater to become green to begin with, as algae flourishes in the light. It will settle down once you add some submerged and floating plants, which will take up excess nitrates from the water and block much of the UV light (both causes of algal flushes).
As our pond was designed for wildlife, we originally added some frogspawn from a friend’s garden pond (never take spawn from the wild – and now the advice is not take it from any other pond to prevent disease spread, so just wait for some frogs to do what comes naturally). The newts found the pond themselves, and of course the birds don’t take long to arrive either. Fortunately no ducks, which would have made quite a mess.
Disguising the liner edge
There are a variety of ways of hiding the liner above the water level but the common method of using flat stones that project some way over the pond does not look right when used around an informal pond unless it is set in a lawn or alongside paving.
For ponds surrounded by plant beds and borders, and for wildlife ponds where you want to create easy access in and out of the pond, you need an alternative. Some place rounded stones or slate paddlestones around the pond and in the water to form a beach. However, unless you can integrate the stones with a scree effect over the surrounding beds, the result is a pond with a stone necklace, which doesn’t always look good.
Some pond liner manufacturers also used to produce strips of gravel-embedded liner to drape over the edge of the pond, but again this needs integrating with the garden.
Our solution has been to create a pond-in-a-basket effect, using woven hurdles designed as lawn and flower bed edging. We’ve clamped them to the rigid pond edge and then held them in place with tent pegs bent to fit. They provide a ladder for frogs and other creatures, and distract the eye from the liner. We originally use hazel edging, but when it eventually disintegrated after some years, we couldn’t find any on sale, so used willow edging instead.
Woven willow hurdles
The hurdles we bought were higher than we needed, so we cut them down to size, and then used a high breaking strain fishing line to tie and hold the springy willow strands closer together.
The third image in the short video below shows three hurdles clamped to the pond edge, to give them a pre-soak and shape them a little. Although this worked well for the hazel hurdles, the willow ones were more springy and the pre-soak had little effect. However, we were able to curve the hurdles enough by bending them (carefully) over the knee.
You don’t have to do this, but it certainly helps when fixing them to the pond edge. You need four hands for fitting each hurdle, or a G clamp as shown in the video.

Edging fixing
As mention above, we used metal tent pegs to fix the hurdles to the pond’s side, avoiding damaging the liner. See diagram right:
Tent pegs are easy to obtain and sold in different qualities. However, the stronger the tent peg is, the harder it is to bend. You’ll need strong hands, grips or a vice, and a hammer to bend them.
Also see part 1 of this video – Visit the beginning of this feature.